How to grip your board
Gripping a longboard, cruiser board or a skateboard is something that can be a bit scary the first time you do it, but it's actually very easy with a bit of practice. We grip decks all day long here in the shop, so we thought we'd ease the pain of learning for you and share our knowledge.
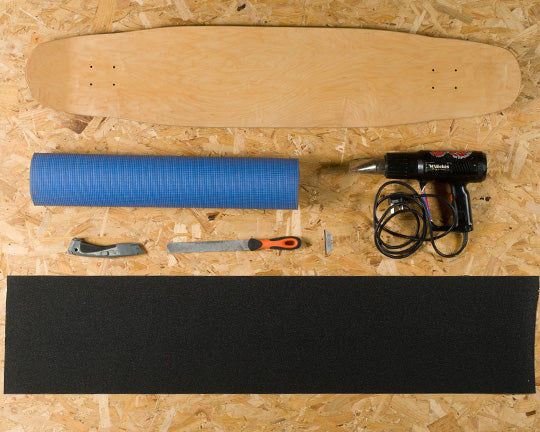
1. Tools Required
You will need:
- A skateboard or longboard.... obviously. If you're starting with a deck that's already got tape on it you'll need to use your heat gun to soften the grip up and peel it off.
- Enough Griptape. You can cut into sections and gave some gaps if you don't quite have enough. Get some tape here!
- A Stanley Knife blade, and you'll probably want a Stanley Knife to go with it.
- A heat gun or a hair dryer, which you only really need if it's cold, or if you need to remove some grip that's already there.
- Something soft (like our blue yoga mat here) to avoid scratching the deck on your work surface. Assuming you care about keeping your board nice, anyway...
We'll start off by laying out the soft mat and making sure everything is to hand.
2. Peel off the backing
Peel off all the backing and put it to one side - you'll need it in a minute. You're now left with a huge sticky thing that loves to attract dust, flies, food and everything else around you - so try to get it down on the deck quickly. If it's cold, it's well worth running along the tape with your hair dryer/heat gun to heat it up - this will make that griptape more supple and a lot easier to work with.

3. Lay the tape down
Start in the middle, and lay the griptape down on the board in a smooth movement. You want to avoid air bubble at this point, so keep it smooth and clean.

4. Rub it!!
Put the tape backing that you peeled off in step one down on the board. Starting from the middle - the first place that you laid down the tape - work outwards rubbing the tape down onto the deck. Your goal is to remove any air bubbles by pushing them out over the sides of the deck. If you get a bubble in the middle of the tape, just poke it with the point of your knife and squeeze the air out.

You can make this job a bit easier by giving the tape a bit more heat from the hair dryer/heat gun.
Heating the griptape also makes it a lot more flexible, so it's a really useful step if you are gripping a deck with a lot of 3D concave or steeper kicks.
If your doing this somewhere cold, like a shed or a garage, you might find the griptape is super stiff and can even crack - heating it up before you apply it really helps avoid this.

5. Score with the file
With all the air bubbles out, score along the edge of the board. This makes it way easier to see where you are going when it comes to cutting the tape with your knife, and it also means that you're cutting a thinner section of tape and the tape is pressed down partway round the radiussed edge of the deck.
This will destroy a file if you grip enough decks, so don't use your parent's favourite metal file...

6. Cut the tape to the edge of the deck
This is the tricky bit - using the edge of the deck as your template, cut the tape to shape with your stanley knife, or if you're really on it like Rob here, a blade without the knife (for finer control).
Try to do the whole outline of the board in as few cuts as you can, keeping your movement smooth and fluid.
You can hold the blade against the board's rail to keep it on track - just make sure that you don't dig into the deck. A good scoring job with the file really helps make this a lot easier!
Notice that Rob is cutting AWAY from his body, and is steadying the blade with his other hand... safety first!